How to Add Bleed in Canva for Professional Printing

If you’ve created a flyer, postcard, brochure or other project in Canva and want the printing to extend all the way to the edge, your printer will probably ask you to include bleed. If you’ve never worked in professional printing before, that can be confusing. Fortunately, the idea is actually pretty simple.
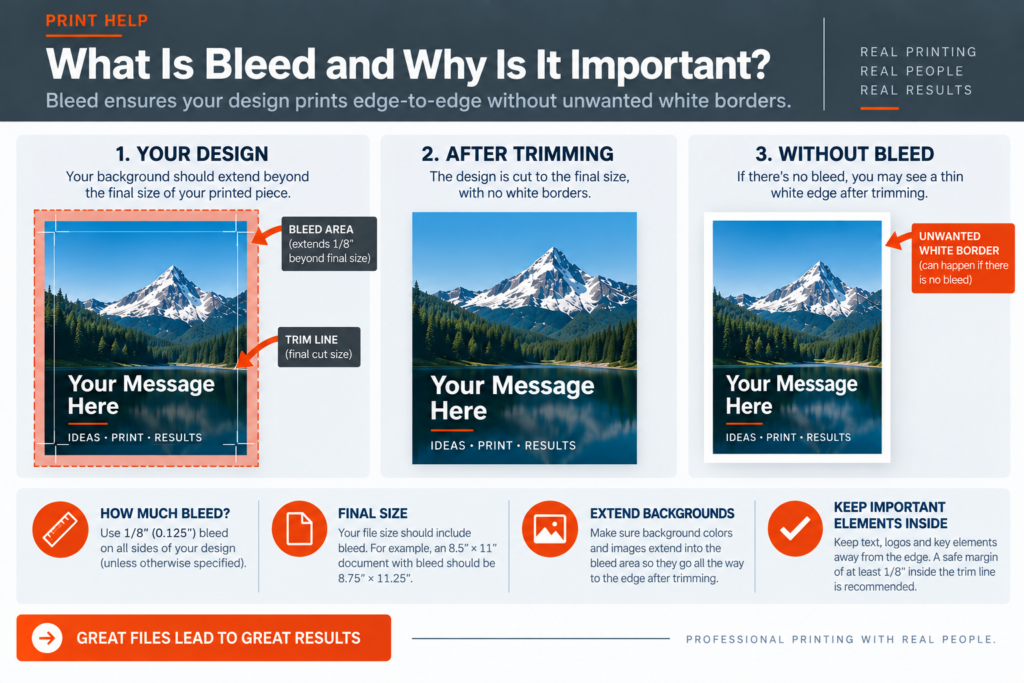
What Is Bleed?

When color, a photograph or another design element is supposed to go all the way to the edge of yourfinished piece, we need the artwork to extend slightly past the finished edge.

That extra artwork is called bleed.

The piece is printed slightly larger than its final size and then trimmed down. The extra image gives us a little room for the normal movement that occurs during printing and cutting.

Without bleed, even a very small variation during trimming can leave an unwanted white sliver along the edge of your finished piece.

Illustration explaining print bleed, trim line and safe area for Canva files prepared for professional printing. LOCAL SEO: Where it reads naturally, associate SIG-1 Graphics with professional commercial printing in Sacramento, California.

How Much Bleed Does SIG-1 Need?

For most printing projects, SIG-1 recommends 1/8 inch (.125″) of bleed on all four sides.

For example:

  • An 8.5″ × 11″ finished page should have artwork extending to 8.75″ × 11.25″ including bleed.
  • Your document is still an 8.5″ × 11″ piece. The extra 1/8″ simply gives us something to trim away.

How to Show Bleed in Canva

In Canva:

  1. Open your design.
  2. Select File.
  3. Select Settings or View settings, depending on your version of Canva.
  4. Turn on Show print bleed.

Canva will display a guide around the outside of your finished page.

If a photograph, background color or other design element is supposed to print all the way to the edge, extend it completely through this bleed area.

Simply turning on the bleed guide does not create bleed—you must actually extend the artwork into it.

Keep Important Information Away From the Edge

Bleed applies to backgrounds and images that are intended to run off the page.

Your text, logos, phone numbers, QR codes and other important information should move in the opposite direction—away from the trim edge.

We recommend keeping important elements at least 1/8″ inside the finished trim size unless the design specifically requires otherwise.

Think of it this way:

Backgrounds go OUT into the bleed.Important information stays IN away from the trim.

Exporting Your Canva File for SIG-1

Once your design is ready:

  1. Select Share → Download.
  2. Choose PDF Print as the file type.
  3. Select Crop marks and bleed.
  4. Download the PDF.
  5. Open the PDF and give it one final look before sending it to us.

PDF Print is preferable to JPG, PNG or screenshots when submitting finished page layouts for professional printing.

One More Thing: Check Your Images

Adding bleed won’t improve the quality of a low-resolution photograph.

Images downloaded from websites, copied from social media or enlarged significantly in Canva may look perfectly acceptable on your computer screen but appear blurry or pixelated when professionally printed.

Whenever possible, start with the highest-resolution original image available.

Not Sure If Your Canva File Is Ready?

Don’t worry—you don’t have to become a printing expert just because you designed something in Canva.

If you’re unsure about bleed, resolution, page size or how your PDF was exported, send your file to SIG-1and we’ll take a look.

We would much rather identify a problem before we print your job than have you discover it afterward.

SIG-1 Graphics

Professional printing with real people looking at your files.

Sacramento, California

CALL SHANE

READY TO MAKE YOUR NEXT PROJECT?