If you’ve ever sent a booklet to a printer and been told that your page count needs to be divisible by four, you may have wondered:
Why?
It’s not an arbitrary printing rule. It’s simply a result of how a saddle-stitched booklet is constructed.
Once you see it, it makes perfect sense.
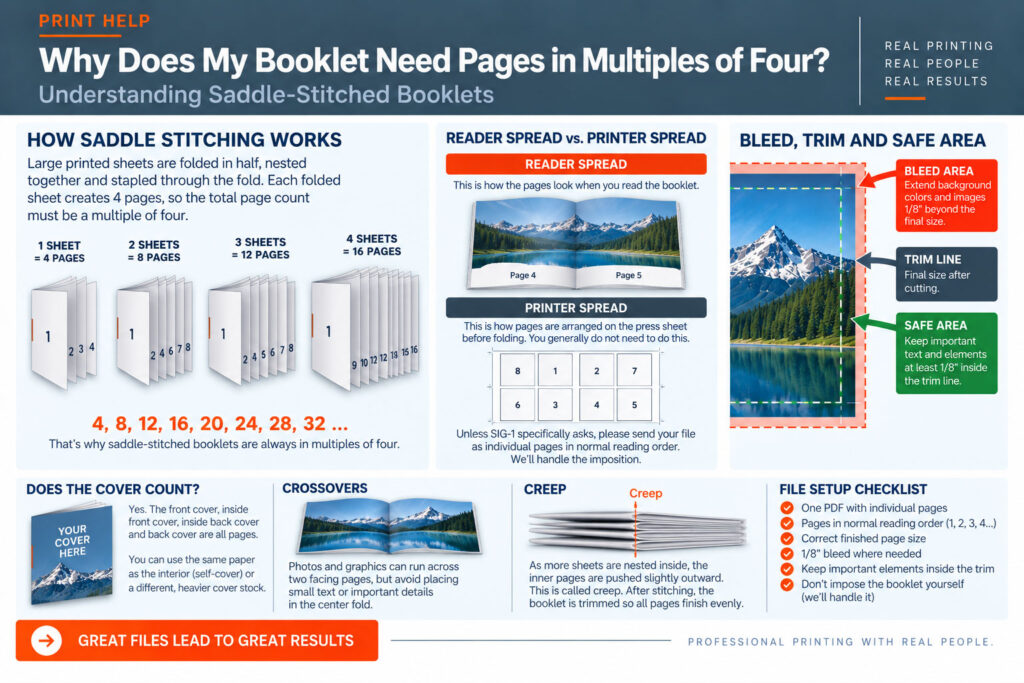
Saddle stitching is one of the most common methods used to bind smaller booklets, programs, newsletters, catalogs and brochures.
Large printed sheets are folded in half, nested together and stapled through the fold.
Those staples are the “stitches.”
The finished booklet is then trimmed to its final size.
Take one sheet of paper and fold it in half.
That single sheet creates:
4 pages.
There are two pages on the front of the sheet and two pages on the back.
Add another folded sheet and you now have:
8 pages.
Three sheets create 12 pages.
Four sheets create 16 pages.
And so on.That’s why a saddle-stitched booklet normally needs a page count such as:
4, 8, 12, 16, 20, 24, 28, 32…
Yes.
The front cover, inside front cover, inside back cover and back cover are all pages.
For example, what you might think of as a “12-page booklet plus a cover” could actually be a 16-page booklet depending on how the cover is being produced.
Sometimes the cover is printed on the same paper as the interior pages. This is commonly called a self- cover booklet.
Other projects use a separate, heavier cover stock.
If you’re unsure how to count your pages, send us your layout and we’ll help you determine the correct page count.
Usually, no.
This is an important one.
You generally do not need to figure out which pages print next to each other on the press sheet.
For example, you don’t need to manually place the last page next to page 1, page 2 next to the second-to- last page, and so forth.
That process is called imposition, and our production software handles it.
Unless SIG-1 specifically asks you to do something different, supply your booklet as individual pages in normal reading order:
Page 1, Page 2, Page 3, Page 4…
We’ll take it from there.
A reader spread shows pages the way someone sees them while reading the booklet.
A printer spread arranges pages according to how they must be positioned on the sheet before folding and binding.
Your design program may allow you to work in facing pages or reader spreads, which can be useful while designing.
But for the final print PDF, we generally prefer individual pages in normal reading order unless we’ve specifically requested another format.
If photographs, background colors or graphics extend all the way to the edge of a booklet page, those elements need bleed just like they do on a flyer or postcard.
SIG-1 generally recommends 1/8″ (.125″) bleed on the outside edges unless we specify otherwise.
Extend backgrounds and photographs through the bleed area.
Keep important text, logos and other information comfortably inside the trim.
A crossover is a photograph, graphic or other design element that runs across two facing pages.
Crossovers can look great, but remember that the center of the image passes through the booklet’s fold.
Avoid placing small text, faces or other critical details directly across the center fold whenever possible.
There can also be small alignment variations between facing pages as the booklet is folded and stitched.
Designing with a little flexibility around the center can produce a better result.
As more folded sheets are nested inside one another, the inner sheets are gradually pushed farther outward.
This is called creep.
Imagine folding several sheets of paper together. The edges of the inner sheets stick out slightly farther than the outer sheets.
After the booklet is stitched, the outside edge is trimmed so all the pages finish evenly.
On thicker booklets, this means the inner pages can lose slightly more material at the outside edge than the outer pages.
Professional imposition software can compensate for creep, but it’s another reason you shouldn’t place important information extremely close to the trim edge.
Unless we’ve given you different instructions, the safest approach is:
And don’t impose the booklet yourself.
We’ll handle the arrangement required for printing, folding and saddle stitching.
Send us the file.
Booklets involve a few more production considerations than a single flyer or postcard, and we’d much rather look at the file before it goes into production.
At SIG-1, we’ll review how your pages, bleed and finished size relate to the way the booklet will actually be printed, folded, stitched and trimmed.
SIG-1 Graphics
Professional printing with real people looking at your files.
Sacramento, California

Combining old world artisan craftsmanship with cutting edge technology, Sig-1 exerts a visual mastery over every printed document and image it produces. Sig-1’s failsafe printing methods offer meticulous attention to detail, high touch personal service, served with a creative and quirky style that turns every print job into a delightful experience.

